Custom Acetate Polishing Manual: How to Restore the “First-Day Glow” of Handmade Eyewear at Home
Handmade acetate eyewear carries something special that mass-produced frames rarely achieve: depth, warmth, and a living surface that changes subtly with time. Unlike injection-molded plastic frames, high-quality acetate develops character through wear — but it can also lose its brilliance. Micro-scratches appear, gloss fades, edges dull, and what once looked luxurious may begin to feel tired.
The good news? Most dull or lightly damaged handmade eyeglass frames don’t need replacement or professional refinishing. With the right knowledge, patience, and safe techniques, you can restore much of their original shine at home.
This comprehensive guide walks you through everything you need to know about polishing acetate frames safely and effectively — from understanding the material itself to step-by-step restoration methods used by professional eyewear craftsmen

Understanding Acetate: Why Handmade Frames Can Be Restored
Before polishing anything, it helps to understand what makes acetate unique.
Cellulose acetate is a plant-based plastic derived from cotton fibers or wood pulp. Unlike petroleum-based plastics, acetate sheets are layered, pressed, cured, and hand-finished. This production process gives frames:
- Rich color depth
- Natural translucency
- Warm tactile feel
- Repairable surfaces
Most importantly, acetate is re-polishable.
When frames lose shine, the problem is usually surface abrasion — not permanent damage. The glossy finish comes from extremely fine polishing rather than coatings, meaning you can recreate it by gradually refining the surface again.
Why Frames Lose Their Shine
Common causes include:
- Skin oils and cosmetics
- Dust acting like sandpaper
- Improper cleaning cloths
- UV exposure
- Pocket or bag friction
- Alcohol-based cleaners
- Dry wiping without rinsing
Over time, microscopic scratches scatter light, turning gloss into haze.
Polishing works by leveling these tiny imperfections until light reflects smoothly again.
When You Should (and Should Not) Polish Frames
Not every frame needs polishing — and polishing too often can shorten lifespan.
Good Candidates for Home Polishing
- Surface haze or dullness
- Fine hairline scratches
- Loss of gloss
- Minor edge roughness
- Cloudy appearance on temples
Avoid DIY Polishing If You Notice
- Deep gouges you can feel with a fingernail
- Cracks near hinges
- Warping from heat
- Peeling laminations
- Severe discoloration
Those issues require professional repair or replacement.
Tools and Materials You’ll Need
You don’t need industrial equipment. Most polishing setups can be assembled at home.
Essential Supplies
Cleaning Stage
- Mild dish soap (non-moisturizing)
- Lukewarm water
- Soft microfiber cloths
- Soft toothbrush
Sanding & Refining
- Micro-mesh sanding pads (1500–12000 grit)
- Wet sandpaper (optional)
- Spray bottle with water
Polishing Stage
- Plastic polishing compound
- Jewelry polishing paste or acrylic polish
- Cotton pads or polishing cloth
Optional Upgrades
- Rotary tool (low speed only)
- Felt polishing wheels
- Masking tape
- Latex or nitrile gloves
Avoid household abrasives like baking soda or toothpaste — they create uneven scratches.
Step 1: Deep Cleaning Before Polishing
Polishing dirty frames pushes debris into the surface, causing more scratches.
Proper Cleaning Process
- Rinse frames under lukewarm water.
- Add a drop of dish soap.
- Gently scrub hinges, nose bridge, and edges with a soft toothbrush.
- Rinse thoroughly.
- Pat dry with microfiber cloth.
Never polish dry frames. Cleanliness determines final clarity.
Step 2: Evaluate the Surface Under Good Lighting
Hold the frames under bright light and rotate slowly.
Look for:
- Scratch direction
- Gloss inconsistency
- Matte zones
- Edge wear
This tells you how aggressive your first sanding stage should be.
Rule: Always start with the least aggressive method possible.
Step 3: Wet Sanding — Resetting the Surface
Wet sanding removes microscopic peaks and valleys responsible for dullness.
Why Wet Sanding Works
Water acts as lubrication, preventing heat buildup and distributing abrasion evenly.
Technique
- Spray surface lightly with water.
- Begin with 3000–4000 grit micro-mesh for light wear.
- Sand gently using small circular motions.
- Keep surface wet at all times.
- Work evenly — avoid focusing on one spot.
You are not trying to remove material quickly. Slow, uniform refinement is key.
Progression Example
- Light haze → start at 4000 grit
- Moderate scratches → start at 2000 grit
- Finish with 8000–12000 grit
Each step removes scratches from the previous grit.
After the final sanding stage, frames will appear uniformly matte — this is correct.
Gloss comes next.
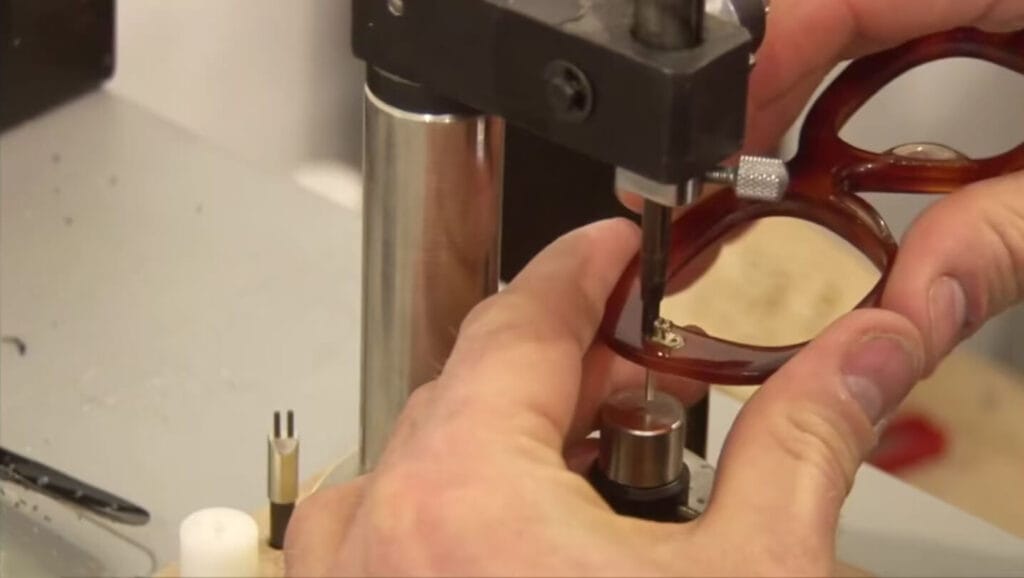
Step 4: Edge Restoration (The Secret Professionals Use)
Edges define luxury eyewear. When edges dull, frames instantly look older.
How to Restore Edges Safely
- Wrap sandpaper around a soft foam backing.
- Follow original edge contours.
- Use minimal pressure.
- Keep movements consistent.
Avoid rounding sharp design lines unless intentionally reshaping.
Handmade frames often feature carefully sculpted bevels — preserve them.
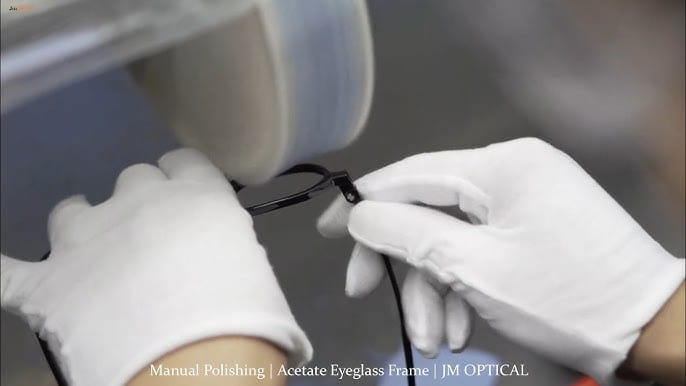
Step 5: Manual Polishing — Bringing Back the Shine
Now you transform matte acetate into gloss.
Applying Polish
- Apply a pea-sized amount of plastic polish.
- Use circular motions with microfiber cloth.
- Polish for 2–3 minutes per section.
- Buff with clean cloth.
You’ll see gloss emerge gradually.
Patience matters more than pressure.
Step 6: Rotary Tool Polishing (Optional Advanced Method)
If you own a rotary tool, it can dramatically improve results — but misuse causes damage.
Safe Settings
- Speed: LOW only (5,000–8,000 RPM)
- Use felt wheels
- Keep tool moving constantly
High speed melts acetate instantly.
Technique
- Light contact only
- Work in short passes
- Stop frequently to check temperature
If frames feel warm, pause immediately.
Step 7: Final Buffing — Achieving the “First-Day Glow”
Professional finish comes from final buffing rather than heavy polishing.
Use:
- Clean dry microfiber
- Long, gentle strokes
- Consistent direction
At this stage, light reflection should appear smooth and mirror-like.
Step 8: Conditioning the Surface
Acetate benefits from hydration.
After polishing:
- Apply a tiny amount of mineral oil or frame conditioner.
- Spread evenly.
- Buff completely dry.
This restores depth and richness to layered acetate colors.
Common Mistakes That Ruin Frames
1. Using Toothpaste
Too abrasive and uneven.
2. Dry Sanding
Creates deep scratches instantly.
3. High Heat
Heat warps acetate permanently.
4. Skipping Grit Levels
Leaves visible swirl patterns.
5. Over-Polishing Logos
Brand engravings can disappear.
How Often Should You Polish?
Polishing removes microscopic material, so moderation matters.
Recommended schedule:
- Light buffing: every 3–6 months
- Full polishing: once per year max
- Daily cleaning: essential
Good maintenance reduces need for aggressive restoration.
Preventing Future Dullness
Daily Habits
- Rinse before wiping.
- Use microfiber only.
- Store in hard case.
- Avoid dashboard heat.
- Keep away from alcohol sprays.
Small habits dramatically extend shine lifespan.
Special Care for Different Finishes
High-Gloss Frames
Easiest to restore; polish normally.
Matte Acetate
Do NOT polish to gloss unless intentional — use fine sanding only.
Transparent Frames
Require extra uniform sanding to prevent visual distortion.
Laminated Color Frames
Use gentle pressure to avoid uneven layer exposure.
Lens Protection During Polishing
Always protect lenses.
Options include:
- Remove lenses (ideal)
- Mask lenses with painter’s tape
- Cover with plastic film
Polishing compound can permanently haze lens coatings.
Professional Techniques You Can Adapt at Home
Eyewear workshops often use multi-stage buffing wheels with compounds of decreasing abrasiveness.
At home, you replicate this by:
- Progressive sanding
- Fine polishing compound
- Soft buffing cloth
Same principle — slower execution.
Signs You’ve Done It Correctly
Your frames should:
- Reflect light evenly
- Feel smooth without drag
- Show deeper color saturation
- Look clearer at edges
- Feel slightly warmer to touch
If gloss appears patchy, repeat final polishing stage.
Restoring Vintage Handmade Eyewear
Older acetate often responds beautifully to polishing because material density was higher in past manufacturing.
Extra steps:
- Clean oxidation carefully.
- Start with finer grit than expected.
- Work slowly around hinge areas.
Vintage frames can regain remarkable brilliance.
The Science Behind Optical Shine
Gloss occurs when surface irregularities fall below visible light wavelength (~400–700 nm). Polishing reduces scratches smaller than this scale, allowing light to reflect coherently instead of scattering.
That’s why gradual refinement works better than aggressive abrasion.
Creating a Home Polishing Kit
A small dedicated kit saves time later.
Recommended setup:
- Micro-mesh pad set
- Plastic polish tube
- Two microfiber cloths (polish + buff)
- Spray bottle
- Masking tape
Store together for quick maintenance sessions.
Environmental Factors That Affect Acetate
UV Exposure
Can dry material and reduce luster.
Sweat & Skin Chemistry
Acids slowly dull surface.
Climate
Dry air accelerates loss of surface smoothness.
Regular gentle care offsets these effects.
When to Seek Professional Help
Choose professional refinishing if:
- Frames need reshaping
- Hinges are loose
- Deep scratches exist
- Structural repairs required
Professionals use tumbling machines and precision buffing wheels not easily replicated at home.
The Emotional Value of Restoring Handmade Eyewear
Handmade frames often carry personal meaning — a favorite style, a luxury investment, or a signature look. Restoring rather than replacing preserves craftsmanship and reduces waste.
Polishing becomes less about repair and more about stewardship.
Quick Three-Minute Shine Refresh (Between Full Polishing)
When frames look slightly dull:
- Wash with soap and water.
- Dry completely.
- Apply tiny amount of polish.
- Buff for one minute per side.
This quick routine maintains brilliance without heavy sanding.
Long-Term Care Routine
Daily: rinse and wipe gently
Weekly: deep clean hinges
Monthly: light buff
Yearly: full polish
Consistency keeps frames looking nearly new for years.
Final Thoughts: Bringing Back the “Original Light”
The beauty of acetate eyewear lies in its renewability. Unlike coated plastics that degrade permanently, handcrafted frames invite restoration. With careful sanding, controlled polishing, and patient buffing, you’re not merely cleaning glasses — you’re reawakening the craftsmanship embedded in the material.
The “first-day glow” isn’t magic. It’s precision, smoothness, and light interacting with a perfectly refined surface.
Once you learn the process, maintaining that glow becomes simple, satisfying, and surprisingly therapeutic.
Treat your frames gently, polish thoughtfully, and your handmade eyewear can continue looking refined, luminous, and distinctly personal for many years to come.
Share this post


Soline Light Gold Base Frame - Wide Rectangle


Mira Bundle Set – 1 Base Frame + 5 Toppers (Choose from 1000+ Toppers) | XCombo Non-Magnetic Interchangeable Glasses

Soline Bundle Set – 1 Base Frame + 5 Toppers (Choose from 1000+ Toppers) | XCombo Non-Magnetic Interchangeable Glasses

No Slipping During Workouts, Polished in Meetings
The Hidden Tech Behind Interchangeable Eyeglass TemplesLet’s start with a familiar frustration.You’re wearing glasses.At your desk, they look sharp.In meetings, they feel...
Magnetic vs Clip-On Modular Glasses
Which Structure Actually Lasts Longer Over Time?Modular glasses are no longer a novelty.They’ve moved past the “cool idea” phase and into real-world...
Minimalist Aesthetics: Exploring the Precision Craftsmanship Behind Mechanical Snap-Fit Eyewear
Minimalism is often misunderstood as simplicity. In reality, true minimalism represents one of the most demanding forms of design. Removing elements does...
Micron-Level Precision: How 3D Cranial Modeling Creates the Feeling of “Invisible” Wear
There is a moment many people experience when trying truly well-designed wearable products for the first time — glasses that seem to...

A Breakthrough for High Myopia: How Custom Eyeglass Frames Make Thick Lens Edges “Disappear”
For people with high myopia, buying eyeglasses has long been a frustrating experience. While vision correction technology has improved dramatically over the...